Screenshot Testing with Compose
In this post, we take a look at what is screenshot/snapshot testing and how to get started with it on Android using Compose and Paparazzi.
In this post, we take a look at what is screenshot/snapshot testing and how to get started with it on Android using Compose and Paparazzi library.
What is screenshot/snapshot testing?
Screenshot (or snapshot) testing is the process of rendering a piece of UI (component or an entire screen), taking a screenshot of it, and comparing it to the reference screenshot that serves as the correct value. It’s a form of unit testing that allows us to quickly verify that a regression was not introduced visually.
 Example of a screenshot test result
Why should we use it?
The biggest benefit of screenshot testing is that it allows us to test the visual part of the app, what the users actually see, which is typically under-tested compared to business logic.
Since the tests are just unit tests, they don’t need to be run on an actual device or emulator, making it easy to check multiple configurations on different screen sizes in a matter of seconds. They also allow us to quickly preview the layout we’re building without running the app on a device or emulator.
It takes very little effort to write and maintain a screenshot test but saves a lot of time in terms of manually checking for regressions. Screenshot tests can also be added to the CI and run on every pull request or before release to check for regressions automatically, without a need for additional QA resources.
What are the drawbacks?
One of the drawbacks is that having a lot of screenshot tests can also increase the size of the Git repository as the number of images/screenshots grows. To solve this it’s recommended to set up Git LFS (Large File Storage) that replaces graphics with text pointers inside of Git and stores the actual files on GitHub or other remote servers.
It’s important to note that screenshot testing is meant to be an additional way to avoid regressions and not a replacement for other testing methods.
Screenshot testing libraries on Android
There are a number of libraries on Android for screenshot testing. Some of the most popular ones at the time of writing are Paparazzi and Roborazzi. Both render screens on the JVM without a device or emulator but take different approaches.
Paparazzi
Paparazzi is an open-source Android library for rendering screens on the JVM without a device or emulator. It works with both the View system and Compose.
It’s developed by engineers at CashApp as a solution for faster development and preview of UI layouts as it doesn’t require launching an emulator, deploying the code, and verifying the result.
Paparazzi relies on LayoutLib to record screenshots, which is a private library used to render the XML layouts and Compose previews in Android Studio. This comes with similar limitations in rendering previews that you can sometimes encounter in Android Studio.
Roborazzi
Roborazzi is also an open-source Android library for rendering screens on the JVM without a device or emulator. The biggest difference compared to Paparazzi is that it works with Robolectric, which allows it to interact with the Android framework. It’s also used for screenshot testing in the nowinandroid project.
Roborazzi uses Robolectric Native Graphics to render the screen, which is a supported API, compared to Paparazzi’s use of LayoutLib.
Which one to choose?
The choice of the testing library depends on the requirements and the state of the project. It’s best to do thorough research based on the constraints of your project’s architecture.
In this post, we use the Paparazzi library to show the general flow of screenshot testing, as it’s easy to set up.
The process of screenshot testing
We are going to use the Jetsurvey sample app to show the entire process of screenshot testing.
1. Set up screenshot testing library (Paparazzi)
To get started with screenshot testing, we first need to add the Paparazzi plugin to the module where we want to run the tests. This can either be the main app module or a feature module.
2. Write a unit test
Next, we have to write a test that will render a piece of UI and produce a screenshot. We add the test to the src/test folder of the Jetsurvey sample app. We define a new JUnit rule for Paparazzi and configure the Paparazzi instance. Paparazzi offers a few different options on how the screenshots will be rendered, including which device to emulate.
To actually capture a screenshot, we simply call paparazzi.snapshot { Composable } and pass in our composable.
The maxPercentDifference defines the maximum percent in which the control and the new screenshots can differ for the test to still pass. This comes into play later when verifying changes.
3. Capture screenshots
To generate the initial screenshots we have to run the previously written tests by running the command ./gradlew <module-name>:recordPaparazziDebug, or more specifically in our case ./gradlew app:recordPaparazziDebug.
After the task is completed, you receive a link to the local report that shows the generated screenshots and a new image appears in the src/test/snapshots/images folder. Its name should by default be <package.of.the.test.module>_<TestClassName>_<testFunctionName>, but it’s possible to configure this.
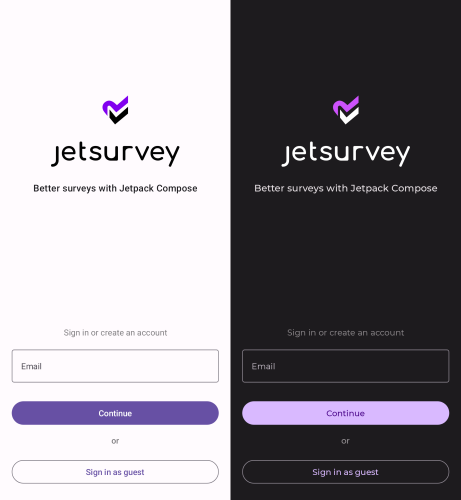
Here is the result of running the above command for the test we’ve written, plus the same test with dark mode enabled.
4. Store screenshots as the source of truth
The captured images should be stored in the version control system as they will be used as a source of truth when making and verifying changes later on.
Note: refer to the drawbacks section above to learn more about how to efficiently store images in Git using Git LFS (Large File Storage).
5. Verifying new changes
We can use the previously captured screenshots when doing regression testing, working on refactoring the screen, or addressing some API changes in the latest version of Compose for example, to verify that no regressions were introduced by capturing a new screenshot and comparing it to the saved one.
We run the comparison by calling the command ./gradlew <module-name>:verifyPaparazziDebug. This command runs the tests, captures new screenshots, and compares them to the stored ones, highlighting any differences.
If the test passes, it means no regressions were introduced.
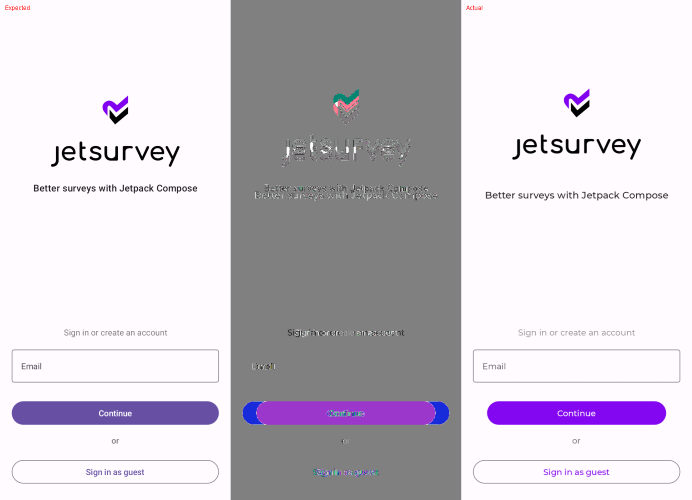
If the test fails, we can see the reason in the generated comparison image shown below. The left side of the image is the expected result, the one we recorded earlier. The right side of the image is the latest result, and the middle image is a diff between the two, showing what’s different.
 The result of comparing captured screenshots
In this specific case, we can see that the positioning of the app logo, title, and subtitle is slightly off and that the “Continue” button is narrower.
6. Resolving the conflict
If the test fails, we have two options on how to proceed depending on whether:
- the change is a regression and it should be fixed to match the expected output. In this case, the test protected us from introducing a regression.
- the change is actually desired, in which case we have to replace the stored (expected) image with the new one. That can be done by simply calling the
recordPaparazziDebugcommand again, which overwrites the existing image.
Conclusion
Screenshot testing allows us to detect visual regressions quickly and with little effort. It works by capturing a screenshot of the UI (single component or whole screen) and comparing it to the previously captured screenshot that serves as the source of truth. If the two screenshots differ, a regression was introduced and needs to either be fixed or the new screenshot should be marked and stored as correct.
There are a number of libraries available for Android. We used Paparazzi to show the whole process of screenshot testing, from writing the unit test and recording the screenshot to verifying that no regressions were introduced after making changes.
Hopefully, this post did a good job highlighting the benefits of screenshot testing and how simple it is to get started. Let me know your thoughts and if you use screenshot testing in your projects or plan to use it.
References and further reading
- https://www.droidcon.com/2022/09/29/snapshot-testing-and-more-with-paparazzi/ — Great talk by John Rodriguez on the details of the Paparazzi library
- https://github.com/sergio-sastre/Android-screenshot-testing-playground/blob/master/README.md — Great overview of all the screenshots testing libraries out there with their pros and cons.
- https://medium.com/xmglobal/snapshot-testing-testing-the-ui-and-beyond-part-1-2369c9f84032 — Great overview of snapshot testing on mobile
