Building a Space News App with Compose Multiplatform for Android, iOS, and Desktop: Part 3 — Offline Support with SQLDelight
The third part of building a Compose Multiplatform app: offline support with SQLDelight.
This is the third part of a series of articles focusing on Compose Multiplatform. We are building an app for Android, iOS, and Desktop that displays the latest Space Flight news.
This part will focus on the following:
- adding loading state and error handling when fetching the data,
- and integrating a local cache using SQLDelight to make the app work even in offline mode.
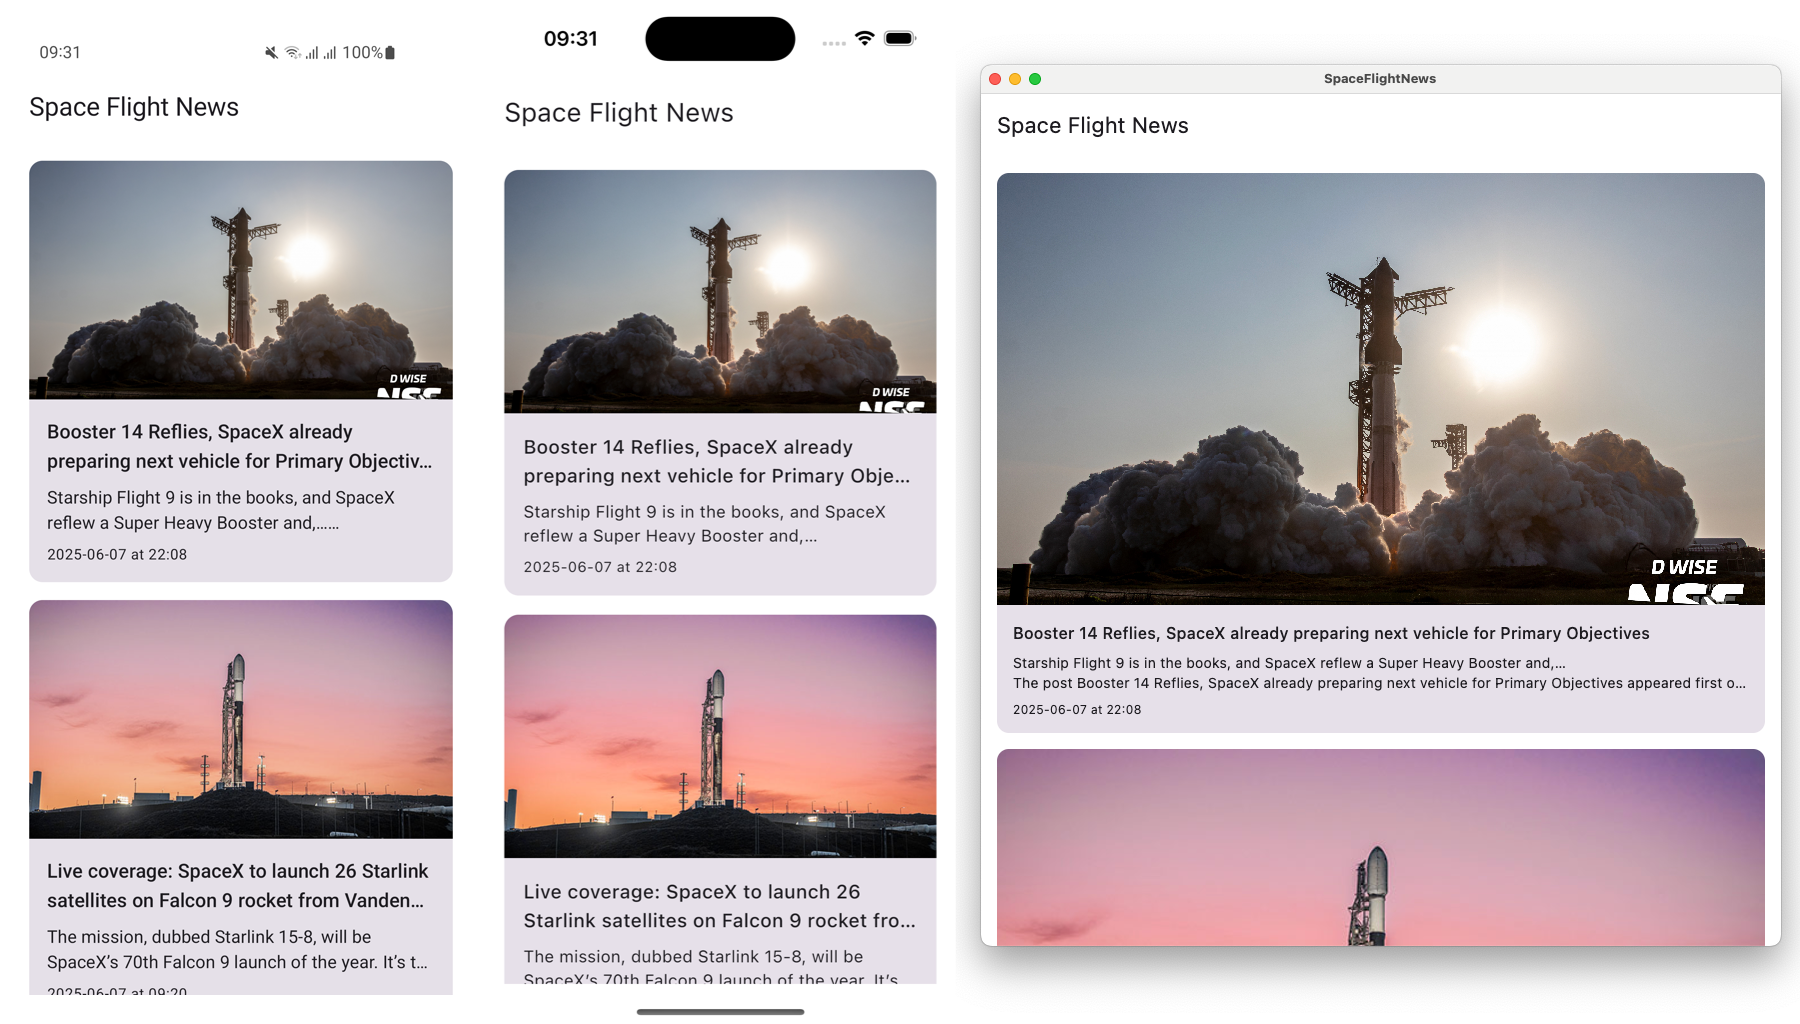
 Showcase of the final app.
Recap of the first two parts
This article continues from where the second part left off, so make sure to start there if you haven’t yet: Building a Space Flight News App with Compose Multiplatform for Android, iOS, and Desktop: Part 2
So far, we’ve learned the following:
- how Kotlin Multiplatform works
- sharing UI using Compose Multiplatform on iOS, Android, and Desktop
- loading remote images with Coil
- adding network layer for fetching remote data with Ktor
- adding dependency injection with Koin.
Also check out first part: Building a Space Flight News App with Compose Multiplatform for Android, iOS, and Desktop: Part 1
You can find the code after part 2, and what will be our starting point for this article, on the part-2 branch of the project repository: https://github.com/landomen/KMPSpaceFlightNews/tree/part-2
1. Add loading and error states
User kanake10 reported that the app currently crashes when there is no internet connection or a network error occurs. They went further and opened a pull request fixing the issue. I would like to publicly thank them for their contribution and describe the changes that have been added since the last update.
Defining the error and loading states
First, let’s extend ArticleListViewState in the ArticleListViewModel class to support the loading and error states. To do that, we can replace the current data class with a sealed interface and define Loading, Success, and Error sub-classes. This will allow us to differentiate between states easily.
1
2
3
4
5
6
7
8
9
10
11
sealed interface ArticleListViewState {
    data object Loading : ArticleListViewState
    data class Success(val articles: List<Article> = emptyList()) : ArticleListViewState
    data class Error(val errorType: ErrorType) : ArticleListViewState
}

sealed class ErrorType {
    data object NoInternet : ErrorType()
    data object ServerError : ErrorType()
    data object Unknown : ErrorType()
}
Sending the new states
Now that we have our new states defined, let’s update ArticleListViewModel to use them. Update the MutableStateFlow definition to use the default value of ArticleListViewState.Loading. We want the app to display a loading state right from the start.
1
private val _state = MutableStateFlow<ArticleListViewState>(ArticleListViewState.Loading)
Next, let’s update the init block where we are currently loading the data. Extract everything inside the init block to a new public function called fetchArticles(). Having a separate function will allow us to reuse it when retrying a failed request.
We’re wrapping the whole request into a try/catch block to handle any exceptions and then update the state with either a Success or an Error state.
1
2
3
4
5
6
7
8
9
10
11
12
13
14
15
16
17
18
19
20
init {
    fetchArticles()
}

fun fetchArticles() {
    viewModelScope.launch {
        _state.value = ArticleListViewState.Loading
        try {
            val articles = apiService.getArticles()
                .filter { it.imageUrl.isNotEmpty() }
            _state.value = ArticleListViewState.Success(articles)
        } catch (_: IOException) {
            _state.value = ArticleListViewState.Error(ErrorType.NoInternet)
        } catch (_: HttpException) {
            _state.value = ArticleListViewState.Error(ErrorType.ServerError)
        } catch (_: Exception) {
            _state.value = ArticleListViewState.Error(ErrorType.Unknown)
        }
    }
}
Add new strings
We’ll need some new strings/texts for the error messages. Open the composeApp/commonMain/composeResources/values/strings.xml file and add the following new strings.
1
2
3
4
5
6
<resources>
    <string name="retry">Retry</string>
    <string name="no_internet">No internet connection. Please try again</string>
    <string name="server_error">Server error. Please try again later</string>
    <string name="something_went_wrong">Something went wrong. Please try again</string>
</resources>
Updating the UI states
Now that we have our state models defined, we can update the UI layer. In ArticleListScreen class we currently have a ArticleListScreen() composable that is currently presenting the ArticleListContent(articles) composable. That is our success state, but we now need to add the loading and error states.
Let’s use a when statement to check for the type of the state and then either draw a progress indicator, the existing ArticleListContent(article), or a new error layout that shows an error message and a retry button. When the retry button is clicked, we call viewModel.fetchArticles() to retry again.
1
2
3
4
5
6
7
8
9
10
11
12
13
14
15
16
17
18
19
20
21
22
23
24
25
26
27
28
29
30
31
32
33
34
35
36
Box(modifier = Modifier.fillMaxSize()) {
    when (val currentState = state) {
        is ArticleListViewState.Loading -> {
            CircularProgressIndicator(modifier = Modifier.align(Alignment.Center))
        }

        is ArticleListViewState.Success -> {
            val articles = currentState.articles
            ArticleListContent(articles = articles)
        }

        is ArticleListViewState.Error -> {
            val errorMessage = when (currentState.errorType) {
                ErrorType.NoInternet -> stringResource(Res.string.no_internet)
                ErrorType.ServerError -> stringResource(Res.string.server_error)
                ErrorType.Unknown -> stringResource(Res.string.something_went_wrong)
            }

            Column(
                horizontalAlignment = Alignment.CenterHorizontally,
                modifier = Modifier.align(Alignment.Center)
            ) {
                Text(
                    text = errorMessage,
                    color = Color.Red,
                    style = MaterialTheme.typography.bodyMedium,
                    modifier = Modifier.padding(16.dp)
                )

                Button(onClick = { viewModel.fetchArticles() }) {
                    Text(text = stringResource(Res.string.retry))
                }
            }
        }
    }
}
The result after launching the app without an internet connection is the following.
 Updated app showing the error and loading states.
2. Add Local Cache using SQLDelight
Currently, if you open the app without an internet connection, you will see an error. We want to be able to use the app and see previously loaded news articles. To do that, we need a persistent local cache to which we will store the fetched articles.
SQLDelight is a simple-to-use wrapper around an SQLite database that works with Kotlin Multiplatform.
Add dependencies
As a first step, we have to add the necessary SQLDelight dependencies to the project. Open the gradle/libs.versions.toml file and add the new libraries. Since we are supporting three different platforms, we have to add the database driver for each of them, alongside the core runtime dependency. Additionally, we will also be using the coroutines extensions library, which will allow us to observe changes using a Kotlin Flow.
We also need to define a new plugin.
1
2
3
4
5
6
7
8
9
10
11
12
[versions]
sql-delight = "2.1.0"

[libraries]
sqldelight-android-driver = { module = "app.cash.sqldelight:android-driver", version.ref = "sql-delight" }
sqldelight-desktop-driver = { module = "app.cash.sqldelight:sqlite-driver", version.ref = "sql-delight" }
sqldelight-native-driver = { module = "app.cash.sqldelight:native-driver", version.ref = "sql-delight" }
sqldelight-runtime = { module = "app.cash.sqldelight:runtime", version.ref = "sql-delight" }
sqldelight-coroutines-ext = { module = "app.cash.sqldelight:coroutines-extensions", version.ref = "sql-delight" }

[plugins]
sqldelight = { id = "app.cash.sqldelight", version.ref = "sql-delight" }
Next, let’s open the composeApp/build.gradle.kts file and add the new dependency to the supported source sets.
1
2
3
4
5
6
7
8
9
10
11
12
13
androidMain.dependencies {
    implementation(libs.sqldelight.android.driver)
}
commonMain.dependencies {
    implementation(libs.sqldelight.runtime)
    implementation(libs.sqldelight.coroutines.ext)
}
iosMain.dependencies {
    implementation(libs.sqldelight.native.driver)
}
desktopMain.dependencies {
    implementation(libs.sqldelight.desktop.driver)
}
In the same file, scroll to the top where the plugins block is and add the SQLDelight plugin.
1
2
3
plugins {
    alias(libs.plugins.sqldelight)
}
Perform a gradle sync, then add the following sqldelight block to the end of the file. It configures the name of the database. Do another sync afterwards.
1
2
3
4
5
6
7
sqldelight {
    databases {
        create("AppDatabase") {
            packageName.set("your.package.spaceflightnews.cache")
        }
    }
}
Generate the database structure
SQLDelight works by turning SQL queries that you write into a type-safe Kotlin database API.
Create a new directory under the composeApp/commonMain directory named sqldelight. The commonMain directory should now have three folders: composeResources, kotlin, and sqldelight.
Inside the new sqldelight directory, create additional packages so that they match the package name you added above: your.package.spaceflightnews.cache.
Then, inside the new package, create a new file named AppDatabase.sq and open it.
You might see a suggestion from Android Studio to install a plugin for working with SQLDelight files. Feel free to install it to get syntax highlighting, but is not necessary.
First, we have to create a table into which we will store the articles. This will be a copy of our Article model, but written in SQL. We are using the id of the article as the primary key as it’s unique for every article. Other columns are of type TEXT, including the dates. We will serialize them to the ISO 8601 (2023–01–02T23:40:57.120Z) format for storing.
CREATE TABLE Article (
    id INTEGER NOT NULL PRIMARY KEY,
    title TEXT NOT NULL,
    url TEXT NOT NULL,
    imageUrl TEXT NOT NULL,
    newsSite TEXT NOT NULL,
    summary TEXT NOT NULL,
    publishedAt TEXT NOT NULL,
    updatedAt TEXT NOT NULL
);
Now that we have our table, we have to define the queries for storing and fetching the data from the table. In .sq files we do that by defining the name of the function and then the corresponding SQL query. SQLDelight will then generate a Kotlin function with that name.
We need four queries for now to:
- insert an article,
- delete all stored articles,
- fetch all stored articles,
- fetch a specific stored article by id.
selectNewestArticles:
SELECT * FROM Article
ORDER BY id DESC
LIMIT 10;

selectArticleById:
SELECT * FROM Article
WHERE id = ?
LIMIT 1;

insertOrReplaceArticle:
INSERT OR REPLACE INTO Article(
    id,
    title,
    url,
    imageUrl,
    newsSite,
    summary,
    publishedAt,
    updatedAt
) VALUES (?, ?, ?, ?, ?, ?, ?, ?);

removeAllArticles:
DELETE FROM Article;
What we have to do next is to generate the Kotlin code based on the queries. Open the terminal in Android Studio and run the following command: ./gradlew generateCommonMainAppDatabaseInterface.
After it has finished, you will find the generated Kotlin code in the composeApp/build/generated/sqldelight directory. This will include the AppDatabase interface for interacting with the database, together with its implementation, and a AppDatabaseQueries class that contains the functions to query the database.
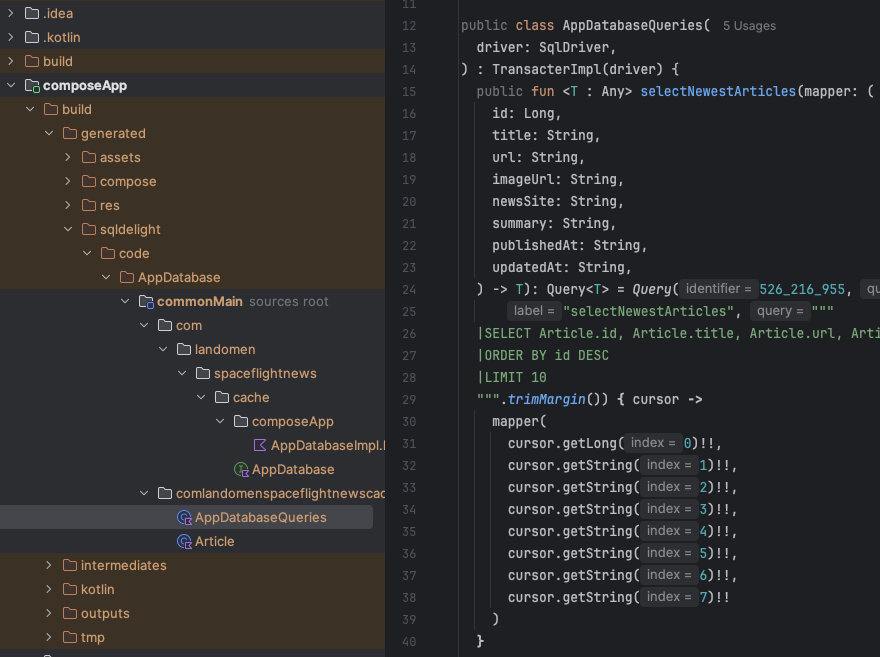 Generated Kotlin code by the SQLDelight library.
Anytime you change the
.sqfile, you must re-run the./gradlew generateCommonMainAppDatabaseInterfacecommand.
Initializing the database
If we take a look at the AppDatabase interface, we see that it expects an instance of SqlDriver in the constructor. Since SQL drivers are platform-specific, we have to provide separate instances for each platform.
Let’s start by creating a common interface for the driver factory in the composeApp/commonMain/your.package.spaceflightnews/cache directory.
1
2
3
4
5
import app.cash.sqldelight.db.SqlDriver

interface DatabaseDriverFactory {
    fun createDriver(): SqlDriver
}
Next, let’s add the Android-specific implementation. Create a new AndroidDatabaseDriverFactory class in the composeApp/androidMain/your.package.spaceflightnews/cache directory that extends the DatabaseDriverFactory interface. It needs to accept an instance of Context as it’s required by the AndroidSqliteDriver.
1
2
3
4
5
6
7
8
9
10
import android.content.Context
import app.cash.sqldelight.db.SqlDriver
import app.cash.sqldelight.driver.android.AndroidSqliteDriver

class AndroidDatabaseDriverFactory(private val context: Context): DatabaseDriverFactory {

    override fun createDriver(): SqlDriver {
        return AndroidSqliteDriver(AppDatabase.Schema, context, "articles.db")
    }
}
In similar fashion, create a new IOSDatabaseDriverFactory in the composeApp/iosMain/your.package.spaceflightnews/cache directory. Here, we’re creating an instance of NativeSqliteDriver.
1
2
3
4
5
6
7
8
import app.cash.sqldelight.db.SqlDriver
import app.cash.sqldelight.driver.native.NativeSqliteDriver

class IOSDatabaseDriverFactory: DatabaseDriverFactory {
    override fun createDriver(): SqlDriver {
        return NativeSqliteDriver(AppDatabase.Schema, "articles.db")
    }
}
And then finally, create one for the desktop in the composeApp/desktopMain/your.package.spaceflightnews/cache directory. The desktop driver is the most peculiar, as we need to create an instance of the JdbcSqliteDriver and pass in the database schema.
1
2
3
4
5
6
7
8
9
import app.cash.sqldelight.db.SqlDriver
import app.cash.sqldelight.driver.jdbc.sqlite.JdbcSqliteDriver

class DesktopDatabaseDriverFactory: DatabaseDriverFactory {

    override fun createDriver(): SqlDriver {
        return JdbcSqliteDriver("jdbc:sqlite:articles.db", Properties(), AppDatabase.Schema)
    }
}
Creating a database wrapper
Now that we have our drivers, we can create a wrapper around the generated database code that will contain our own logic.
Create a new Database class in the composeApp/commonMain/your.package.spaceflightnews/cache directory. It should accept an instance of DatabaseDriverFactory interface in the constructor. We use it to create an instance of the generated AppDatabase, which in turn gives us access to the generated database queries.
1
2
3
4
internal class Database(databaseDriverFactory: DatabaseDriverFactory) {
    private val database = AppDatabase(databaseDriverFactory.createDriver())
    private val dbQueries = database.appDatabaseQueries
}
Next, let’s add a new function insertArticles for storing the articles in the database. It accepts a list of the existing Article models and then inserts each of them into the Article table. Before that, we remove all existing articles so that we always have the latest ones stored.
Note that we are doing this in a transaction to prevent data loss in case the delete query would be successful, but one of the insert queries would fail.
1
2
3
4
5
6
7
8
9
10
11
12
13
14
15
16
17
fun insertArticles(articles: List<Article>) {
    dbQueries.transaction {
        dbQueries.removeAllArticles()
        articles.forEach { article ->
            dbQueries.insertOrReplaceArticle(
                id = article.id,
                title = article.title,
                url = article.url,
                imageUrl = article.imageUrl,
                newsSite = article.newsSite,
                summary = article.summary,
                publishedAt = article.publishedAt.toString(),
                updatedAt = article.updatedAt.toString(),
            )
        }
    }
}
Now that we’ve inserted the data, we also need functions for fetching it. Create a new function getNewestArticles that returns all the stored data from newest to oldest.
We can see that the generated query contains a mapper function, which we can use to map individual table columns into our Article object.
We are using the .asFlow() extension function from the sqldelight-coroutines-extensions library to observe changes to the Article table. We will need this for easy offline mode.
As the
Articlemodel uses theInstanttype for itspublishedAtandupdatedAtfields, we have to serialize it to a string to be able to store it into the database. We are leveraging theInstant.toString()function for that, which returns an ISO 8601 representation of the date (2023–01–02T23:40:57.120Z). To then convert the string back to anInstant, we are using theInstant.parse(string)constructor.
1
2
3
4
5
6
7
8
9
10
11
12
13
14
15
16
17
18
19
20
21
import app.cash.sqldelight.coroutines.asFlow
import app.cash.sqldelight.coroutines.mapToList
import kotlinx.coroutines.Dispatchers
import kotlinx.coroutines.IO
import kotlinx.coroutines.flow.Flow
import kotlinx.datetime.Instant

fun getNewestArticles(): Flow<List<Article>> {
    return dbQueries.selectNewestArticles { id, title, url, imageUrl, newsSite, summary, publishedAt, updatedAt ->
        Article(
            id = id,
            title = title,
            url = url,
            imageUrl = imageUrl,
            newsSite = newsSite,
            summary = summary,
            publishedAt = Instant.parse(publishedAt),
            updatedAt = Instant.parse(updatedAt),
        )
    }.asFlow().mapToList(Dispatchers.IO)
}
And finally, we need one more function to fetch a specific article by id. We will use it on the new detail screen.
1
2
3
4
5
6
7
8
9
10
11
12
13
14
fun getArticleById(id: Long): Article? {
    return dbQueries.selectArticleById(id) { id, title, url, imageUrl, newsSite, summary, publishedAt, updatedAt ->
        Article(
            id = id,
            title = title,
            url = url,
            imageUrl = imageUrl,
            newsSite = newsSite,
            summary = summary,
            publishedAt = Instant.parse(publishedAt),
            updatedAt = Instant.parse(updatedAt),
        )
    }.executeAsOneOrNull()
}
Create a Repository
Now that we have our database set up, it’s time to use it. We are going to create a Repository that will contain logic for interaction between the network layer and the local layer, but hide it from the caller.
Create a new ArticlesRepository class in the composeApp/commonMain/your.package.spaceflightnews/data directory. It should accept the DatabaseDriverFactory interface and the ApiService class as constructor parameters. We also need to initialize the Database class we created earlier and pass in the DatabaseDriverFactory instance.
1
2
3
4
5
6
7
8
9
10
import com.landomen.spaceflightnews.cache.Database
import com.landomen.spaceflightnews.cache.DatabaseDriverFactory
import com.landomen.spaceflightnews.network.ApiService

internal class ArticlesRepository(
    databaseDriverFactory: DatabaseDriverFactory,
    private val api: ApiService
) {
    private val database = Database(databaseDriverFactory)
}
Next, let’s define two functions that we will call from the UI layer:
getArticles(): tries to first fetch the latest data from the API, store it in the local database, and return it. If the network request fails, it will try to return the data from the local database. If the data is not yet cached (first run) or it fails, it will throw the original exception.getArticlyById(id: Long): returns a specific article or null if it’s not found
We are using the local database as a fallback in case of an error for simplicity sake. Another potential solution would be to observe the articles table using a Kotlin Flow and then trigger a network request as a side-effect, storing data into the database, which in turn would re-emit the changes.
1
2
3
4
5
6
7
8
9
10
11
12
13
14
15
16
17
18
19
20
21
suspend fun getArticles(): List<Article> {
    try {
        return api.getArticles().also {
            database.insertArticles(it)
        }
    } catch (e: Exception) {
        try {
            val storedArticles = database.getNewestArticles()
            if (storedArticles.isNotEmpty()) {
                return storedArticles
            }
            throw e
        } catch (e: Exception) {
            throw e
        }
    }
}

fun getArticleById(id: Long): Article? {
    return database.getArticleById(id)
}
Update ViewModel
Now that we have our repository set up as well as the database layer, let’s use it in the view model. Open ArticleListViewModel and replace the ApiService dependency with the new ArticlesRepository.
1
internal class ArticleListViewModel(private val repository: ArticlesRepository) : ViewModel() {
Next, update the fetchArticles() function and replace apiService.getArticles() call with repository.getArticles() call. And that’s it! Our View Model is now using both the network and local database to fetch articles and show them even when no internet connection.
However, the app currently fails to build as we need to provide the new dependencies.
3. Updating dependency injection
We have everything set up; the only thing remaining is the dependency injection. We have to provide instances of the new classes with Koin.
Update AppModule
Let’s start with the AppModule file. Let’s update the appModule property by providing the ArticlesRepository and then updating the ArticleListViewModel instance to pass in the new repository instead of the old service. Finally, make it public as we will need to access it outside of the class.
1
2
3
4
5
6
7
8
9
10
val appModule = module {
    single<ApiService> { ApiService() }
    single<ArticlesRepository> {
        ArticlesRepository(
            databaseDriverFactory = get(),
            api = get()
        )
    }
    viewModel { ArticleListViewModel(repository = get()) }
}
Next, delete the koinConfig: KoinAppDeclaration property, as we will need to create it directly at the call site later.
And finally, we will declare a new platform-specific module that each platform will implement to provide the respective database driver.
1
expect val platformModule: Module
Update App
Open the App file and update the App composable to accept an optional KoinAppDeclaration argument. We will use this to provide an Android-specific Context object through Koin.
1
2
3
4
@Composable
fun App(koinAppDeclaration: KoinAppDeclaration? = null) {
    ...
}
Next, update the call to the KoinApplication composable to not use the deleted koinConfig, but create an instance right there. In it, we will invoke the optional KoinAppDeclaration and provide the needed modules.
1
2
3
4
5
6
7
8
9
10
@Composable
@Preview
fun App(koinAppDeclaration: KoinAppDeclaration? = null) {
    KoinApplication(application = {
        koinAppDeclaration?.invoke(this)
        modules(appModule, platformModule)
    }) {
        ...
    }
}
Update MainActivity
The Android database driver requires a Context object, which is only supported on Android. We need a way to provide it with Koin, and the only place where it’s accessible is in the composeApp/androidMain source set.
Open MainActivity and update the call to the App() composable by passing in a new instance of KoinAppDeclaration and providing the Context object using the androidContext extension function.
1
2
3
4
5
setContent {
    App({
        androidContext(this@MainActivity.applicationContext)
    })
}
Koin can now provide the Context object whenever we need it.
Implement platform-specific modules
Our setup is nearly complete. We just have to provide the actual implementation of the platformModule we declared earlier in AppModule.
For Android, create a new AppModule.android.kt file under the composeApp/androidMain/your.package.spaceflightnews/di directory. Start typing the word actual and autocomplete should suggest the platformModule property. We need to return a new Module that provides an instance of the AndroidDatabaseDriverFactory as the implementation of DatabaseDriverFactory interface. Because we earlier provided Koin with the Context object, we can use the get() function inside single to access it.
1
2
3
4
actual val platformModule: Module
    get() = module {
        single<DatabaseDriverFactory> { AndroidDatabaseDriverFactory(context = get()) }
    }
For iOS, create a new AppModule.ios.kt file under the composeApp/iOSMain/your.package.spaceflightnews/di and similarly implement the platformModule property and provide an instance of IOSDatabaseDriverFactory.
1
2
actual val platformModule: Module
    get() = module { single<DatabaseDriverFactory> { IOSDatabaseDriverFactory() } }
And finally, for Desktop, create a new AppModule.desktop.kt file under the composeApp/desktopMain/your.package.spaceflightnews/di and implement the platformModule property and provide an instance of DesktopDatabaseDriverFactory.
1
2
actual val platformModule: Module
    get() = module { single<DatabaseDriverFactory> { DesktopDatabaseDriverFactory() } }
4. Run and test the app
After a lot of setup, it’s finally time to run and test the app! The Android and Desktop apps should build and run with no issues. The iOS build requires an additional step to support the SQLite database.
 Android app running in offline mode.
 Desktop app running in offline mode.
Fixing the iOS build
Before we can run the iOS app, we have to add the dynamic linking flag for SQLDelight to Xcode build settings. This will allow the Xcode tooling to find the system-provided SQLite binary needed for the NativeDatabaseDriver to work.
- Open the iOS project in Xcode and double-click on the project name.
- In the settings, select the “Build Settings” tab and search for the “Other Linker Flags” property.
- Double-click on the empty property value, then press the “+” button, enter
-lsqlite3, and press “Enter”. - Run the project.
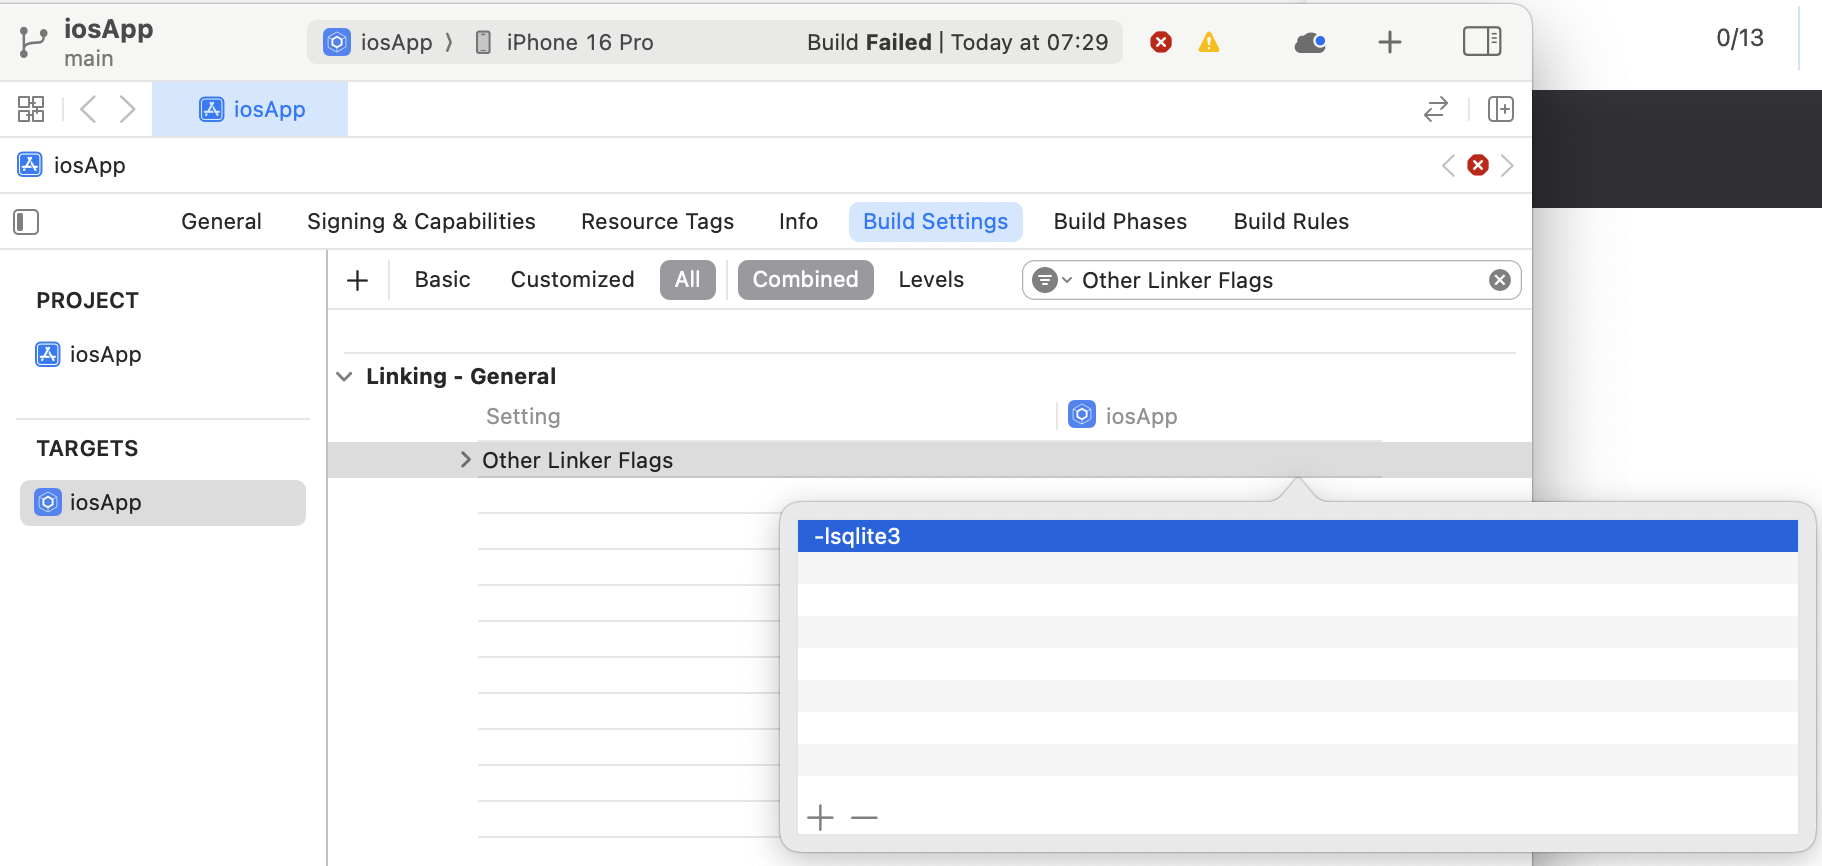 Adding the necessary config to Xcode to support the SQLite database.
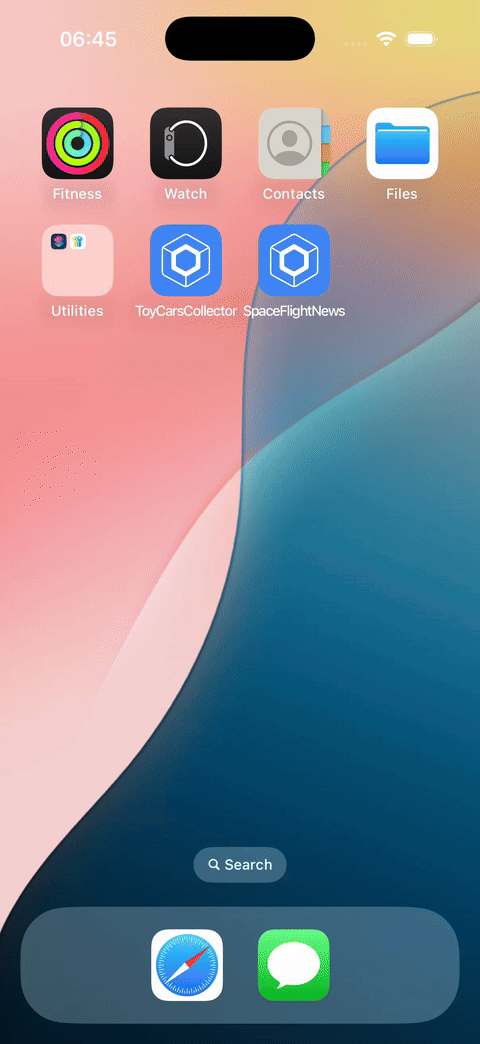 iOS app running in offline mode.
5. Conclusion
If you followed to the end, great job! This is the end of the third part of the series on Kotlin Multiplatform and Compose Multiplatform. We’ve improved our app by adding the loading state and handling errors gracefully. Then we’ve introduced offline mode support by adding a local database to our app with SQLDelight.
In the next part of the series, we are going to:
- Add a detail screen showing the full article.
- Add the Compose Navigation library to navigate to the new detail screen.
- Add a system share functionality to share links to articles with different apps.
- Show how to open the article URL in a web browser.
Stay tuned!
 Current state of the app.
You can find the source code for this part here: https://github.com/landomen/KMPSpaceFlightNews/tree/part-3
To get notified of when the next part is out, please consider following me and subscribing to the email notifications.