Building a Space Flight News App with Compose Multiplatform for Android, iOS, and Desktop: Part 2 — Fetching Data from API with Ktor and Koin
The second part of building a Compose Multiplatform app, fetching data with Ktor and Koin.
This is the second part of a series of articles focusing on Compose Multiplatform. Over the next few parts, we will build an app for Android, iOS, and Desktop that displays the latest Space Flight news.
This part will focus on the following:
- integrating a network layer using Ktor to load data from the API,
- sharing view models across platforms,
- and adding dependency injection using Koin.
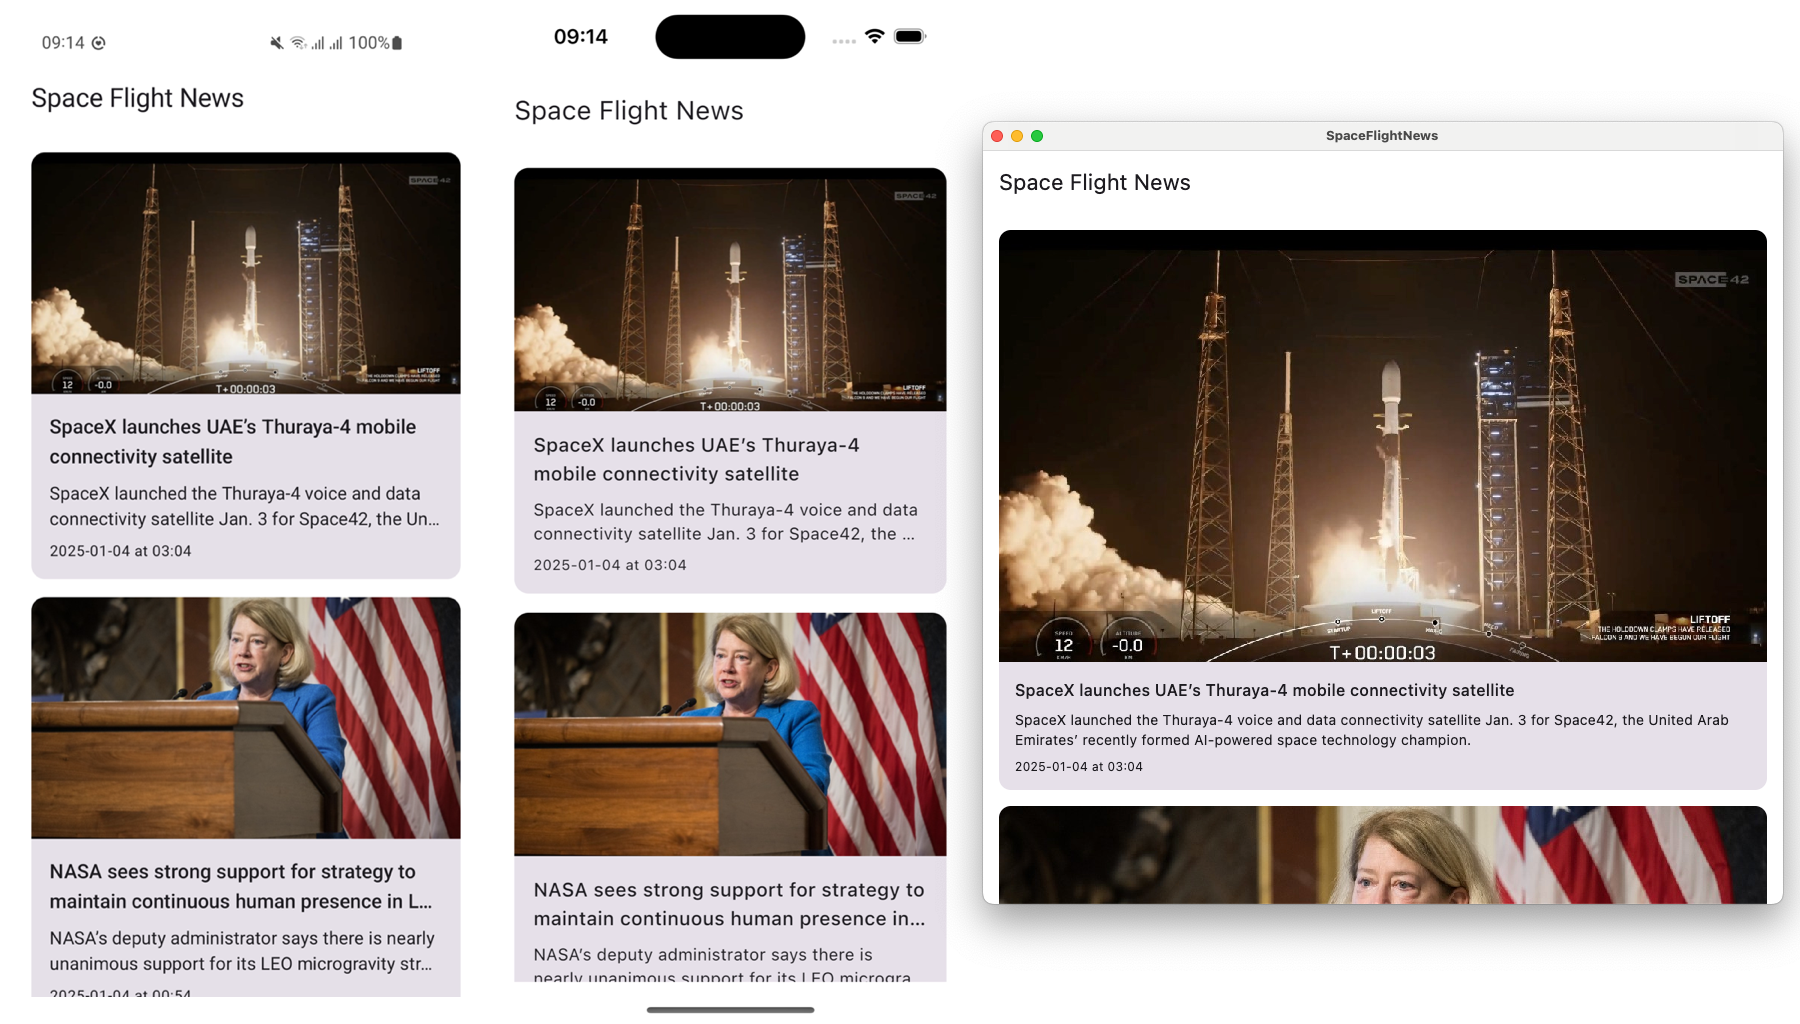
 Showcase of the final app.
Recap of the first part — Getting Started
This article continues from where the first part left off, so make sure to start there if you haven’t yet: Building a Space Flight News App with Compose Multiplatform for Android, iOS, and Desktop: Part 1 — Getting Started with KMP.
In the first part, we built a simple (for now) news app and took a look at how:
- to create a new KMP project with shared UI using Compose Multiplatform,
- to run the app on different platforms,
- the project is structured with shared modules, source sets, and a separate iOS project,
- to enable the Material3 design system and create a custom theme,
- to add new string resources,
- to use the
kotlix-datetimelibrary, - to build and display a list of items with Compose,
- and to load remote images with Coil.
 Result at the end of the first part.
You can find the final code for part 1 on the part-1 branch of the project repository: https://github.com/landomen/KMPSpaceFlightNews/tree/part-1
Updating dependencies
Before we proceed, let’s ensure that our dependencies are up to date. Open the gradle/libs.versions.toml file and check if there are any versions underlined with a yellow line. If there are, it means a newer version is available. Feel free to update all the outdated dependencies.
At the time of writing this article, these are the latest versions of the dependencies we’re using:
1
2
3
4
5
6
7
8
9
10
11
12
13
14
15
16
17
18
19
20
[versions]
agp = "8.10.1"
android-compileSdk = "36"
android-minSdk = "24"
android-targetSdk = "36"
androidx-activityCompose = "1.10.1"
androidx-appcompat = "1.7.1"
androidx-constraintlayout = "2.2.1"
androidx-core-ktx = "1.16.0"
androidx-espresso-core = "3.6.1"
androidx-lifecycle = "2.9.0"
androidx-material = "1.12.0"
androidx-test-junit = "1.2.1"
compose-multiplatform = "1.8.1"
junit = "4.13.2"
kotlin = "2.1.21"
kotlinx-coroutines = "1.10.2"
kotlinx-datetime = "0.6.2"
coil = "3.2.0"
ktor = "3.1.3"
Also, make sure to update the Gradle version in gradle.wrapper.properties :
1
distributionUrl=https\://services.gradle.org/distributions/gradle-8.14.2-bin.zip
Creating a network layer with Ktor
Our app currently uses hardcoded data, making the app static. As a first step, we’ll add the Ktor networking library, which will allow us to fetch the latest news from the API.
Adding the Ktor dependency
Let’s start by first adding the needed dependencies to the gradle/libs.versions.toml file.
If you followed the previous article and added the Coil library for image loading, then you already have the first three libraries and only need to add the remaining ones.
1
2
3
4
5
6
7
8
9
10
[versions]
ktor = "3.1.3"

[libraries]
ktor-client-android = { module = "io.ktor:ktor-client-android", version.ref = "ktor" }
ktor-client-darwin = { module = "io.ktor:ktor-client-darwin", version.ref = "ktor" }
ktor-client-java = { group = "io.ktor", name = "ktor-client-java", version.ref = "ktor" }
ktor-client-content-negotiation = { module = "io.ktor:ktor-client-content-negotiation", version.ref = "ktor" }
ktor-client-core = { module = "io.ktor:ktor-client-core", version.ref = "ktor" }
ktor-serialization-kotlinx-json = { module = "io.ktor:ktor-serialization-kotlinx-json", version.ref = "ktor" }
Why do we need so many different versions of the Ktor library? A different client library is needed for different platforms:
ktor-client-coreis the main implementation of Ktor that will be used on all platformsktor-client-androidis designed specifically for Androidktor-client-darwinis designed specifically for iOSktor-client-javais designed specifically for desktop and webktor-client-content-negotiationis needed to be able to read the JSON responsektor-serialization-kotlinx-jsonis needed to be able to parse the JSON response to models using Kotlinx Serialization
Next, let’s open the composeApp/build.gradle.kts file and use the dependencies. We have to apply the correct libraries to the appropriate source set, like so:
1
2
3
4
5
6
7
8
9
10
11
12
13
14
15
16
17
androidMain.dependencies {
    implementation(libs.ktor.client.android)
}

commonMain.dependencies {
    implementation(libs.ktor.client.core)
    implementation(libs.ktor.client.content.negotiation)
    implementation(libs.ktor.serialization.kotlinx.json)
}

iosMain.dependencies {
    implementation(libs.ktor.client.darwin)
}

desktopMain.dependencies {
    implementation(libs.ktor.client.java)
}
Adding the Kotlinx Serialization
We’ve added the Ktor dependency, which will allow us to fetch data from the API. However, as the response from the API is in raw JSON, we have to be able to convert it to a Kotlin object. To do that, we’re going to use the Kotlinx Serialization library.
Add the plugin dependency to the plugins section in the gradle/libs.versions.toml file:
1
2
[plugins]
kotlinSerialization = { id = "org.jetbrains.kotlin.plugin.serialization", version.ref = "kotlin" }
Next, open the composeApp/build.gradle.kts file and apply the new plugin in the plugins block, like so:
1
2
3
4
plugins {
    ...
    alias(libs.plugins.kotlinSerialization)
}
Perform a Gradle sync and that’s it!
Defining the response models
We previously defined an Article class which represents a single news item we get from the API. As a reminder, this is the API response definition:
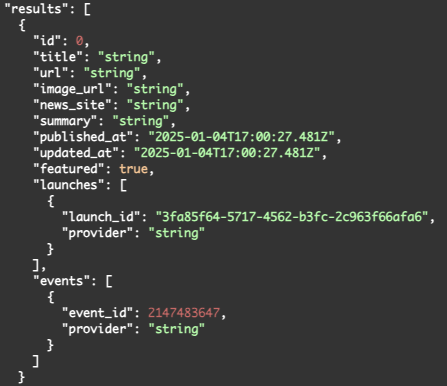 The response model of the SpaceFlightNews API.
This is our model, which is based on that.
1
2
3
4
5
6
7
8
9
10
11
12
import kotlinx.datetime.Instant

data class Article(
    val id: Long,
    val title: String,
    val url: String,
    val imageUrl: String,
    val newsSite: String,
    val summary: String,
    val publishedAt: Instant,
    val updatedAt: Instant,
)
To map the JSON response to our model, we have to add annotations to tell the Kotlinx Serialization library and Ktor how to do that.
Every class that is used for an API response or request has to have an @Serializable annotation that we add above the class definition.
1
2
3
4
5
6
7
8
9
10
11
12
13
14
15
import kotlinx.datetime.Instant
import kotlinx.serialization.SerialName
import kotlinx.serialization.Serializable

@Serializable
data class Article(
    val id: Long,
    val title: String,
    val url: String,
    val imageUrl: String,
    val newsSite: String,
    val summary: String,
    val publishedAt: Instant,
    val updatedAt: Instant,
)
While in Kotlin we’re using the standard camel case naming convention, JSON uses the snake case convention. The names of the class properties have to match the names of the fields in the JSON response. If they don’t, the value won’t be serialized properly.
Examples of these fields would be: imageUrl, newsSite, publishedAt and updatedAt. To fix that, we can explicitly specify the name of the field that it should get mapped to using the @SerialName("field_name") annotation above the class property.
1
2
3
4
5
6
7
8
9
10
11
12
13
14
15
16
17
18
19
import kotlinx.datetime.Instant
import kotlinx.serialization.SerialName
import kotlinx.serialization.Serializable

@Serializable
data class Article(
    val id: Long,
    val title: String,
    val url: String,
    @SerialName("image_url")
    val imageUrl: String,
    @SerialName("news_site")
    val newsSite: String,
    val summary: String,
    @SerialName("published_at")
    val publishedAt: Instant,
    @SerialName("updated_at")
    val updatedAt: Instant,
)
Excellent, we now have the main model for the article set up. However, if you take a look at the response from the API, you will see that it contains a list of articles. To be able to properly serialize that response, we have to create a new response model inside the /composeApp/commonMain/app-name/network/model package.
1
2
3
4
5
6
import kotlinx.serialization.Serializable

@Serializable
data class ArticlesResponse(
    val results: List<Article>
)
Creating an API Service
Now that we have our response models set up, let’s create the API service that will be used to execute the network request.
Create a new class ApiService inside the /composeApp/commonMain/app-name/network package.
First thing we have to do is create an instance of a HttpClient that will allow us to execute network requests.
1
2
3
4
5
6
import io.ktor.client.HttpClient

class ApiService {

    private val httpClient = HttpClient {}
}
HttpClient by itself doesn’t know how to handle the request and response content, and how to convert it to Kotlin models. Ktor supports adding plugins to the client, which we’re going to leverage to add support for parsing the JSON responses.
We have to install the ContentNegotiation plugin that handles request and response formats. Then we have to register the json content type and provide an instance of a Json object. The Json object is part of the Kotlinx Serialization library and allows us to configure rules for parsing the JSON.
1
2
3
4
5
6
7
8
9
10
11
12
13
14
15
16
import io.ktor.client.HttpClient
import io.ktor.client.plugins.contentnegotiation.ContentNegotiation
import io.ktor.serialization.kotlinx.json.json
import kotlinx.serialization.json.Json

class ApiService {

    private val httpClient = HttpClient {
        install(ContentNegotiation) {
            json(Json {
                ignoreUnknownKeys = true
                useAlternativeNames = false
            })
        }
    }
}
Now that we have the HttpClient setup, we can write the network request code. Let’s create a new suspending function getArticles() that will fetch the news from the API and return a list of articles.
What we have to do is use the HttpClient to perform a GET request to the https://api.spaceflightnewsapi.net/v4/articles/?format=json endpoint, retrieve the response, and then return the list of articles.
1
2
3
4
5
6
7
8
9
10
11
import io.ktor.client.call.body
import io.ktor.client.request.get

suspend fun getArticles(): List<Article> {
    return httpClient.get("${BASE_URL}/articles/?format=json")
        .body<ArticlesResponse>().results
}

companion object {
    private const val BASE_URL = "https://api.spaceflightnewsapi.net/v4"
}
And that’s it! We can now call this function from our screen to fetch actual data from a server.
There is just one small fix we have to do to be able to properly load images. Sometimes the imageUrl field in the Article can start with http instead of https which is a security concern and images fail to load. To fix that, let’s modify the URLs so that they always start with https.
1
2
3
4
5
6
7
8
9
10
11
12
13
14
15
suspend fun getArticles(): List<Article> {
    return httpClient.get("${BASE_URL}/articles/?format=json")
        .body<ArticlesResponse>().results.map {
            val imageUrl = it.imageUrl.ensureHttpsUrl()
            it.copy(imageUrl = imageUrl, summary = it.summary.trim(), title = it.title.trim())
        }
}

private fun String.ensureHttpsUrl(): String {
    return if (startsWith("https")) {
        this
    } else {
        replaceFirst("http", "https")
    }
}
Using a View Model
So far, we’ve hardcoded all the data inside the composable functions. To improve this and follow an MVVM architecture, we will introduce view models to our codebase. It will allow us to fetch the data from the ApiService we created.
Kotlin Multiplatform supports using the MVVM architecture across all platforms. It provides a version of the ViewModel class, which is similar to the one you find on Android, except it also supports iOS, desktop, and web.
To be able to use it, we have to declare a dependency in the gradle/libs.versions.toml file. It’s likely that you already have these dependencies there and don’t need to add them again.
1
2
3
4
5
6
7
[versions]
androidx-lifecycle = "2.9.0"

[libraries]
androidx-lifecycle-viewmodel = { group = "org.jetbrains.androidx.lifecycle", name = "lifecycle-viewmodel", version.ref = "androidx-lifecycle" }
androidx-lifecycle-runtime-compose = { group = "org.jetbrains.androidx.lifecycle", name = "lifecycle-runtime-compose", version.ref = "androidx-lifecycle" }
androidx-lifecycle-viewmodel-compose = { group = "org.jetbrains.androidx.lifecycle", name = "lifecycle-viewmodel-compose", version.ref = "androidx-lifecycle" }
Next, let’s add the dependency to the composeApp/build.gradle.kts file:
1
2
3
4
5
commonMain.dependencies {
    implementation(libs.androidx.lifecycle.viewmodel)
    implementation(libs.androidx.lifecycle.runtime.compose)
    implementation(libs.androidx.lifecycle.viewmodel.compose)
}
Perform a Gradle sync, and now we can create a new View Model class for the ArticleListScreen. Create a new ArticleListViewModel class that extends the ViewModel class. It will accept the ApiService that we created earlier as a constructor parameter.
1
2
3
4
5
import androidx.lifecycle.ViewModel

class ArticleListViewModel(private val apiService: ApiService) : ViewModel(){
    // TODO
}
Next, we have to define a view state model that the screen will observe and react to. Let’s create a new class ArticleListViewState below the ArticleViewModel class that, for now, has a single property articles that contains the list of loaded articles.
1
2
3
data class ArticleListViewState(
    val articles: List<Article> = emptyList(),
)
Next, let’s define an observable state in the view model using Kotlin’s StateFlow. We’re exposing a StateFlow, but using a MutableStateFlow as a backing field to be able to post updates.
1
2
3
4
5
6
7
8
import androidx.lifecycle.ViewModel
import kotlinx.coroutines.flow.MutableStateFlow
import kotlinx.coroutines.flow.StateFlow

class ArticleListViewModel(private val apiService: ApiService) : ViewModel(){
    private val _state = MutableStateFlow(ArticleListViewState())
    val state: StateFlow<ArticleListViewState> = _state
}
Finally, we have to use our ApiService to fetch the data. We’re going to do that in the init function by launching a new coroutine using the viewModelScope coroutine scope provided by the ViewModel.
1
2
3
4
5
6
7
8
9
10
11
12
13
14
15
16
17
import androidx.lifecycle.ViewModel
import androidx.lifecycle.viewModelScope
import kotlinx.coroutines.flow.MutableStateFlow
import kotlinx.coroutines.flow.StateFlow
import kotlinx.coroutines.launch

class ArticleListViewModel(private val apiService: ApiService) : ViewModel(){
    private val _state = MutableStateFlow(ArticleListViewState())
    val state: StateFlow<ArticleListViewState> = _state

    init {
        viewModelScope.launch {
            val articles = apiService.getArticles()
            _state.value = _state.value.copy(articles = articles.filter { !it.imageUrl.isEmpty() })
        }
    }
}
Once we have the new articles, we have to update our view state, which will cause the composable UI to recompose/update and display the updated list.
Using the View Model
Now that we have our View Model ready, let’s update our composable function to use it. Go to ArticleListScreen and delete the hardcoded list of articles inside the ArticleListScreen composable. It should now look like this:
1
2
3
4
5
6
@Composable
internal fun ArticleListScreen() {
    ArticleListContent(
        articles = articles,
    )
}
Next, let’s create an instance of our ArticleListViewModel by using the viewModel {} builder. We also have to create an instance of ApiService and pass it to our view model instance.
1
2
3
4
5
6
7
8
9
10
import androidx.lifecycle.viewmodel.compose.viewModel

@Composable
internal fun ArticleListScreen() {
    val viewModel: ArticleListViewModel = viewModel { ArticleListViewModel(ApiService()) }

    ArticleListContent(
        articles = articles,
    )
}
This is just temporary for now. We will add dependency injection soon to provide the view model and the service using Koin.
Now that we have a reference to our view model, we can start observing the view state using the collectAsStateWithLifecycle function. Once we have the state, we can read articles from it and pass it to the ArticleListContent composable.
1
2
3
4
5
6
7
8
9
10
11
import androidx.lifecycle.compose.collectAsStateWithLifecycle

@Composable
internal fun ArticleListScreen() {
    val viewModel: ArticleListViewModel = viewModel { ArticleListViewModel(ApiService()) }
    val state by viewModel.state.collectAsStateWithLifecycle()

    ArticleListContent(
        articles = state.articles,
    )
}
Testing the app
We have everything set up, and if we start the Android, iOS, or desktop app, we should see that the newest articles are loaded correctly.
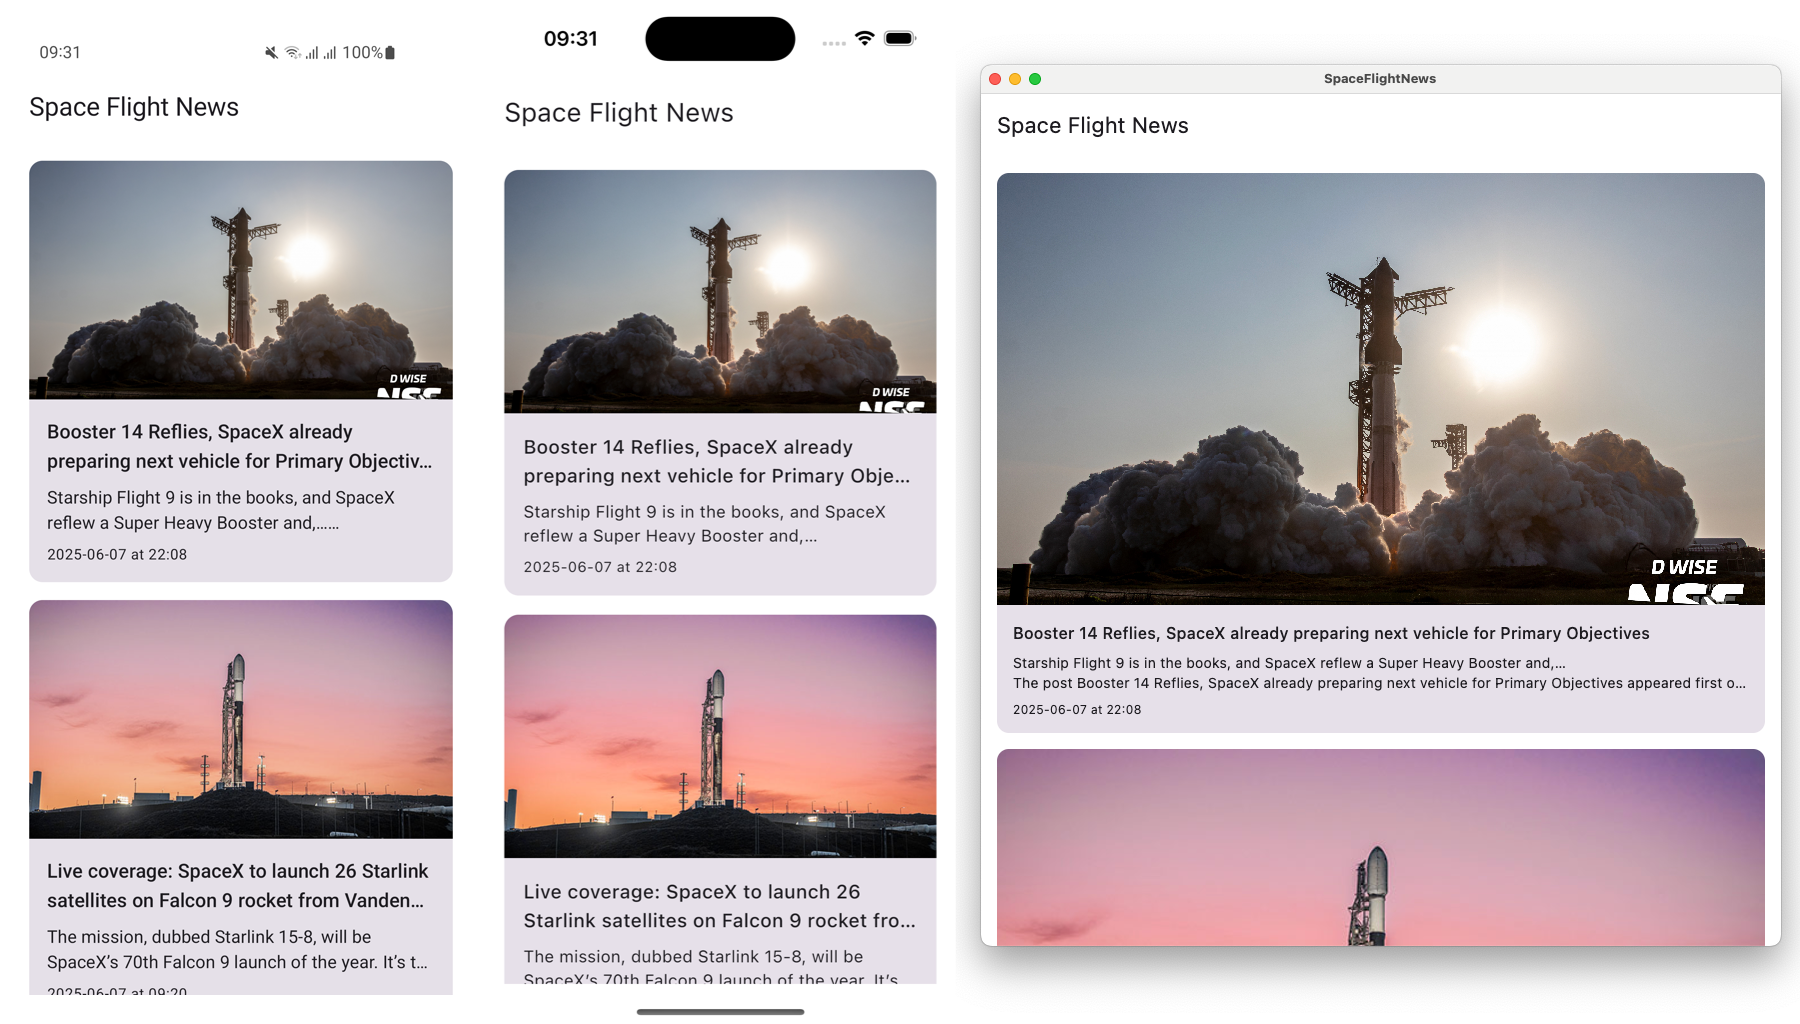 Result of running the app with remotely loaded data on all three platforms.
If you’re trying the app on Android and are experiencing a crash, it’s most likely due to a missing internet permission. In that case, you have to declare the permission in the AndroidManifest under the composeApp/androidMain source set.
1
2
3
4
5
6
7
8
<?xml version="1.0" encoding="utf-8"?>
<manifest xmlns:android="http://schemas.android.com/apk/res/android">

    <uses-permission android:name="android.permission.INTERNET" />

    <application ... />

</manifest>
After adding that, the app should work okay and load, and show the latest articles.
Adding dependency injection using Koin
Koin is a Kotlin dependency injection framework that offers easy integration with Kotlin and Compose Multiplatform.
As usual, let’s start by declaring needed dependencies in the gradle/libs.versions.toml file. We need the core, android, and view-model libraries:
1
2
3
4
5
6
7
[versions]
koin = "4.1.0-RC1"

[libraries]
koin-core = { module = "io.insert-koin:koin-core", version.ref = "koin" }
koin-android = {module = "io.insert-koin:koin-android", version.ref = "koin"}
koin-compose-viewmodel = {module = "io.insert-koin:koin-compose-viewmodel", version.ref = "koin"}
Next, add the dependencies to the composeApp/build.gradle.kts file:
1
2
3
4
5
6
7
androidMain.dependencies {
    implementation(libs.koin.android)
    implementation(libs.koin.core)
}
commonMain.dependencies {
    implementation(libs.koin.compose.viewmodel)
}
Perform a Gradle sync, and after that, we can start hooking everything up.
Creating an AppModule
To be able to provide dependencies, we have to create a Koin module. In the composeApp/commonMain/di package we will create a new AppModule.kt file. Next, let’s declare an appModule property and use the module {} builder to provide instances of ApiService and ArticleListViewModel.
1
2
3
4
5
6
7
8
import org.koin.core.module.dsl.viewModel
import org.koin.dsl.module

private val appModule = module {
    single<ApiService> { ApiService() }

    viewModel { ArticleListViewModel(apiService = get()) }
}
If you receive an error that
viewModelfunction can only be invoked in the context of a composable function, make sure that theviewModelfrom Koin package is imported and not the one from Androidx Lifecycle.
We’re using the single function to provide a singleton instance of ApiService. This means that the same instance will be used everywhere in the app for the duration of the application lifecycle.
To provide an instance of the ArticleListViewModel, we’re using the viewModel function. ArticleListViewModel needs an instance of ApiService which we can retrieve using the get() function. Koin is able to return the instance as we registered it above.
Now that we have our appModule defined and set up, we have to create a Koin configuration and pass in our module.
1
2
3
4
5
6
7
8
9
10
11
12
13
14
import org.koin.core.module.dsl.viewModel
import org.koin.dsl.KoinAppDeclaration
import org.koin.dsl.koinConfiguration
import org.koin.dsl.module

val koinConfig: KoinAppDeclaration = {
    modules(appModule)
}

private val appModule = module {
    single<ApiService> { ApiService() }

    viewModel { ArticleListViewModel(apiService = get()) }
}
Starting Koin
To init Koin, we will update our App() composable function by wrapping the contents with the KoinApplication composable function and providing it the config we created in AppModule.
1
2
3
4
5
6
7
8
9
10
11
12
13
import org.koin.compose.KoinApplication


@OptIn(ExperimentalMaterial3Api::class)
@Composable
@Preview
fun App() {
    KoinApplication(koinConfig) {
        AppTheme {
            ...
        }
    }
}
Using the injected objects
Now that we have Koin set up, let’s go back to ArticleListScreen and replace this line:
1
val viewModel: ArticleListViewModel = viewModel { ArticleListViewModel(ApiService()) }
with:
1
2
3
import org.koin.compose.viewmodel.koinViewModel

val viewModel = koinViewModel<ArticleListViewModel>()
We’re no longer creating a new instance of the view model and API service in the ArticleListScreen, but retrieving it through Koin.
We can now run the app and see that it still works correctly. We are now using dependency injection on all three platforms!
While the introduction of dependency injection doesn’t seem worth it at this stage, it will later allow us to easily extend the app with more screens, database layer and sharing functionality.
Conclusion
If you followed to the end, great job! This is the end of the second part of the series on Kotlin Multiplatform and Compose Multiplatform. We’ve built a news app that fetches updated data from an API, and during the process, we took a look at how:
- to integrate a network layer using Ktor to load data from the API,
- to use view models across platforms,
- and to add dependency injection using Koin.
Final result showing the app running on Android, iOS and Desktop.
In the next part of the series, we are going to:
- Add a detail screen showing the full article.
- Add the Compose Navigation library to navigate to the new detail screen.
- Add a database layer to cache the data in case there is no internet connection using the SQLDelight library.
- Add a system share functionality to share links to articles with different apps.
- Show how to open the article URL in a web browser.
Stay tuned!
You can find the source code for this part here: https://github.com/landomen/KMPSpaceFlightNews/tree/part-2
To get notified of when the next part is out, please consider following me and subscribing to the email notifications.